Welcome,
Sorry, you are not Logged in.
Sorry, you are not Logged in.
|
Click Here to download the latest version of the plugin: http://nanacast.com/memberlock/nanacast.com-memberlock-1.6.zip Overview MemberLock allows you to restrict WP content to be viewable by registered site members. It is designed to work "out-of-the-box" with no modifications to your theme. While Nanacast.com is a completely independent, full-featured membership system, Member Lock allows you also take advantage of all that wordpress has to offer. It fully integrates with Nanacast.com allowing you to use the wide variety of payment methods and pricing structures available on Nanacast.com while at the same time using wordpress to distribute your content to your members. Content can be made public or for members only. It also allows you to post "teaser" excerpts on your home page which are made available to the public, but when you click on the "read more" link it displays your sales message and prompts you to login. Quick Start/Installation 1. Download and unzip. Upload the memberlock/ folder to your /wp-content/plugins/ folder on your wordpress blog.
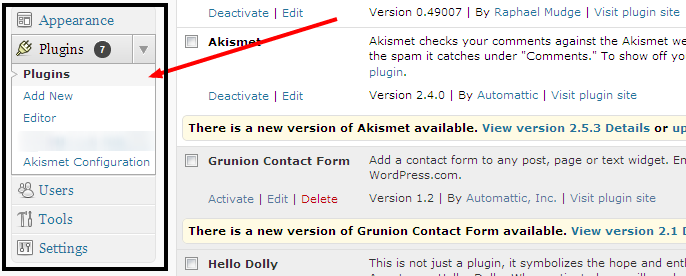
2. Activate the plugin through the 'Plugins' menu in WordPress
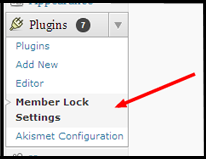
3. Click on the Member Lock Settings link at the top and fill out the settings 4. Create your membership in Nanacast.com. (You may have to go back and tweak your member lock settings in wordpress after you create your membership.)
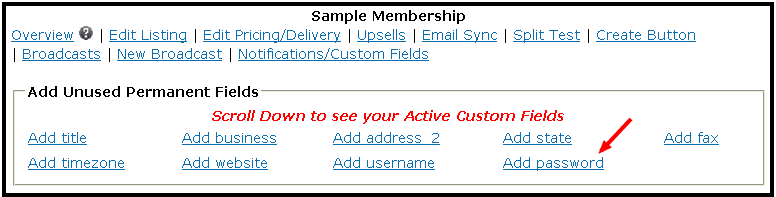
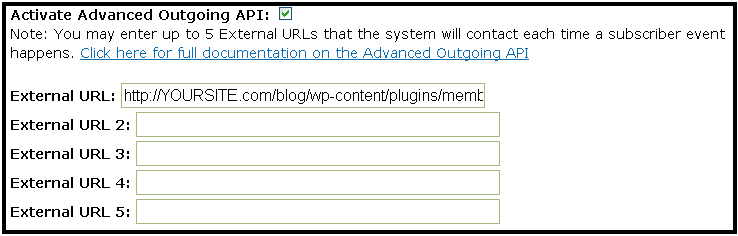
5. You MUST add 'Password' as a Custom Field for your membership. (Go to: Notifications / Custom Fields >> Add Password) 6. Checkmark "Activate Advanced Outgoing API" for your membership, and then enter your memberlock API URL:
http://YOUR-BLOG.com/wp-content/plugins/memberlock/memberlock_api.php?security_code=YOUR-MADE-UP-SECURITY-CODE Go to >> Notifications / Custom Field >> Check the box "Activate Advanced Outgoing API") 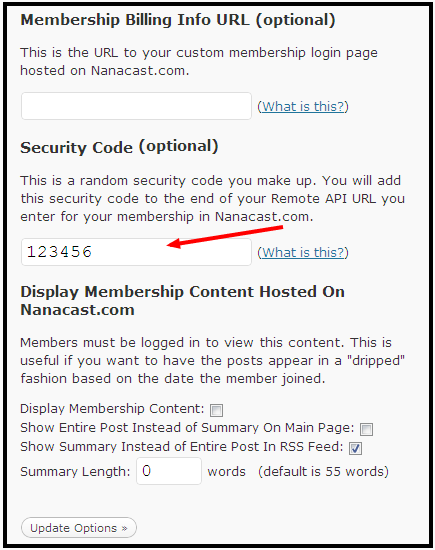
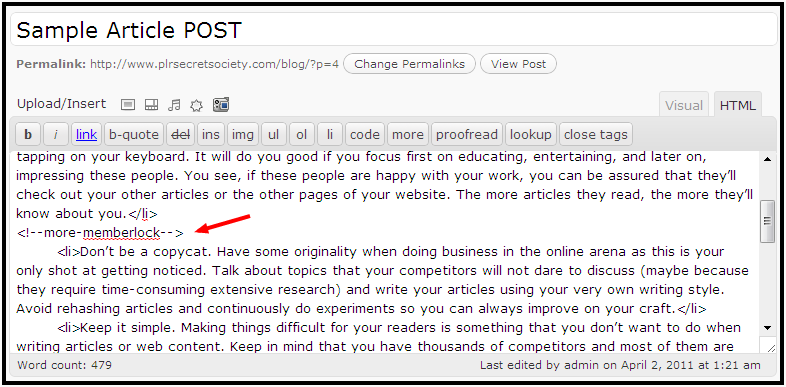
7. Place <!--more-memberlock--> in the HTML of your posts. Content below the tag will be hidden to public visitors.
Using the <!--more--> tag in public posts to show "teasers" Wordpress allows visitors to view content two different ways: 1: On the "summary" style pages (home, archive, category), where it lists all the posts down the page 2: When you click on a single post so that now you are viewing just one post. When creating a post in wordpress, there is a checkbox to the right called "Keep this post private". If you checkmark this, it will not show the post on any "summary" pages at all unless you are logged in. However, if you leave it unchecked, then the post will be public. Leaving the post public allows you to use the "<!--more-->" tag built-in to wordpress in order to restrict part of the post. Simply click to view HTML when creating a post, and enter <!--more--> anywhere in the post. Now on the overview page it will show the first part of your post to the public, but will hide everything following the <!--more--> tag. It will add a link that says "Read the rest of this entry>>". When a visitor clicks on this link, it will take them to the "single post" page where it will display the entire post. Again, this functionality is built into wordpress by default.
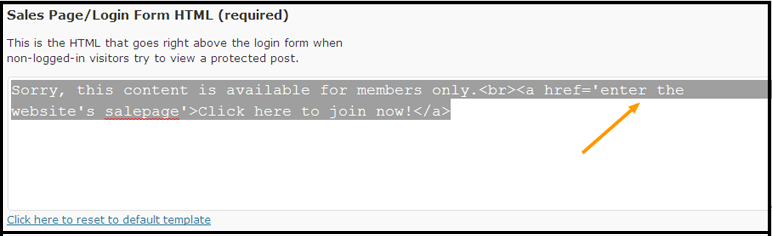
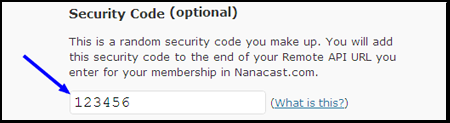
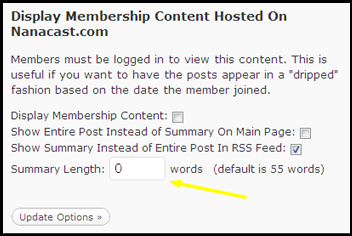
Using the <!--more-memberlock--> tag to show "teasers" to the public but keep the full post private MemberLock expands upon this built-in feature by allowing you to show "teasers" to the public on "summary" pages but restricting the rest of the post to members who are logged in. To do this, use the tag <!--more-memberlock--> within your post just like you would use <!--more-->. Now when a public visitor clicks the link to "Read the rest of this entry>>", it will take them to a special login page where they must login to view the rest of the post. Your HTML that you added to the "Sales Page Link HTML" field is what will go right above the login boxes. This allows you to customize what you want to show on the login page. You could simply have some text encouraging existing members to login and non-members to click a link to another sales page on your site, or you could even embed your Nanacast.com order form HTML code right into this page so that your visitors could purchase the membership right there. Customizing the "Read the rest of this entry>>" link By default, wordpress will replace the "<!--more-->" tag with the text "Read the rest of this entry>>" However, you can customize the link text using the following method: <!--more Click Here to Read More of This Post... --> Adding the above tag will make the link say "Click Here to Read More of This Post..." instead of the default text. This also applies to the "<!--more-memberlock-->" tag. Simply use this format: "<!--more-memberlock Click Here to Read More of This Post (members only)... -->" Enabling the MemberLock Widget Within your Wordpress Admin panel, click on Design >> Widgets. Then click Add next to the Member Lock plugin. This will add a small box on your side menu that will contain a login form if the visitor is not logged in. If they are logged in, it will contain their login status along with a link to the "Membership Billing Info URL" that you've entered in the plugin settings, and a logout link. MemberLock Plugin Settings 1. "Sales Page Link HTML": This is the HTML that will appear right above the login form on the page that visitors will see when they click the link to "Read the rest of this entry...". 2. Membership Billing Info URL: This is the URL to your customized membership login page. You can find this URL by logging into your Nanacast.com account and going to Manage >> Links >> Membership Logins. When your members are logged into wordpress, they will see this link on their side menu with the text "Edit Billing Information". They can then click this link, which will take them to your customized membership login hosted on Nanacast.com where they can login and manage their billing info. 3. Security Code: This security code should be a number or password that you make up. When used in conjunction with your Remote API URL in Nanacast.com, your wordpress site will be secured so that intruders can't hit your Member Lock API and create unauthorized accounts. 4. Display Membership Content Hosted on Nanacast.com: This setting allows you to drip content into your blog so that members will see new posts appear based on the time they joined your membership. First you will need to add your content to Nanacast.com and determine when each episode (or post) will be sent out (1 day after subscription, 7 days after subscription, etc...) much like an email autoresponder that you may be familiar with. You may also add content directly to your blog like you normally would. When your member joins your membership on Nanacast.com, a unique RSS feed is created for your member which will contain the posts that only that member should see based on the date they joined. Memberlock stores this RSS feed on your blog for each user when the user is created. This is made possible through the memberlock API. Whenever your member logs in to your blog and hits the homepage, memberlock will grab the user's unique RSS feed contents in the background and will combine the new posts with the posts that you've already added directly to your blog. The posts are then sorted by date so they will appear in the correct order on your blog homepage. When a member clicks on the title of one of the posts that originated from Nanacast.com, it will open in a new window and will display the entire post.
Display Membership Content: This makes the dripped content feature active or inactive. Nanacast.com membership configuration: Member Lock is designed to work with a Nanacast.com membership. Login to your Nanacast.com account follow the steps through the wizard to create your membership. Setting Up the Required Custom Fields The required custom fields are: firstname, lastname, email, password. The fields "firstname, lastname and email" are automatically added for you during the membership wizard. However, password is not automatically added during the wizard, so you will need to click to add "Password" in your list of permanent custom fields. When you add the password field you will see an option to have the system automatically generate passwords so your clients don't have to type one in. Username is optional but is recommended as a custom field. This is because the Nanacast.com system makes sure that username is unique, thereby ensuring that your usernames will also be unique in Wordpress. However, if you don't want to ask your members to enter username the system will just use their email address as their username. This introduces the possibility of having two accounts in wordpress with the same email address. Not very likely, but possible. (someone would have to order your membership twice with the same email) The password your member creates will work on your wordpress blog and also to get into your custom membership login page hosted on Nanacast.com. Setting Up the Email Receipt Once you have set up all your custom fields, you should go back to the "Edit Pricing" page for your membership to modify the email receipt that will be sent out for your membership. Now that you have added your custom fields, you will see the custom variable tags you can use in the email receipt.
The tags {username} and {password} refer to the username and password that your clients should use to login to your wordpress blog AND your membership hosted on Nanacast.com. Activating the Remote API On the "Custom Fields/Notifications" page, you will need to checkmark "Activate Advanced Outgoing API", and then enter the following URL in one of the "External URL" boxes: http://example.com/wp_dir/wp-content/plugins/memberlock/memberlock_api.php?security_code=12345 Replace "example.com/wp_dir/" with the domain name and directory for your wordpress blog. Replace "12345" with the security code you made up and entered into the Member Lock Plugin Settings in your wordpress admin panel. The security code is optional, but it is recommended to ensure that no one can create unauthorized members using your Member Lock API script. Just make sure that these two security code values are the same in both places. Using Multiple Nanacast.com Memberships for one Memberlock Installation You can use multiple Nanacast.com membership levels with one memberlock installation as long as the different memberships are grouped within Nanacast.com. The reason for this is because memberlock and WP only allows one account per unique username (or email address). So if you have two memberships, it is possible for one client to belong to both memberships in the Nanacast.com system, but not on wordpress. If both of these memberships were both integrated with the same memberlock installation, then each one would constantly overwrite the single client record in your wordpress blog as various events happen within Nanacast.com. This would cause different membership content to be displayed to the client on your wordpress blog, depending on whichever membership had the last API event hit your memberlock installation. So to avoid this problem all you need to do is put all the memberships within one group in Nanacast.com using the Membership Grouping feature. Then make sure you checkmark to cancel the old membership when upgrading/downgrading to a different membership in the same group. This way someone can upgrade to "Gold" and the system would make sure that their "Silver" membership was cancelled so it wouldn't cause any conflicts with their new Gold membership on your wordpress blog.
For example, first you would create multiple memberships in Nanacast.com, (one for silver, gold and platinum), group them, and then once your blog has Memberlock properly installed just make sure that each membership in Nanacast.com has the remote API activated and is pointed to the same memberlock installation in the on the "Custom Fields/Notifications" page as outlined above. Additional Tips 1. In wordpress under Options > General, it is recommended that you leave "Anyone can register" unchecked. This way members can only be created through the API or through the wordpress admin panel. 2. Make sure you log out of the admin before you test. If you are logged in as admin, you will be able to click through to view the entire post. (To know if you are logged in, we suggest using the Member Lock widget which shows your status on the sidebar.) |